Using a Python Virtual Environment (Recommended)
on bash at root dir , I successed!
python3 -m venv circup-env
source circup-env/bin/activate
pip install circup
circup --version
再度circupを使用するにはroot dirでsource circup-env/bin/activate
Using a Python Virtual Environment (Recommended)
on bash at root dir , I successed!
python3 -m venv circup-env
source circup-env/bin/activate
pip install circup
circup --version
再度circupを使用するにはroot dirでsource circup-env/bin/activate
たとえばpico-examplesのなかのblinkだけをコンパイルする場合
blinkにおりてCMakeLists.txtを以下のようにした
cmake_minimum_required(VERSION 3.13)
include($ENV{PICO_SDK_PATH}/external/pico_sdk_import.cmake)
project(blink C CXX ASM)
pico_sdk_init()
add_executable(blink
blink.c
)
target_link_libraries(blink
pico_stdlib
)
if (PICO_CYW43_SUPPORTED)
target_link_libraries(blink
pico_cyw43_arch_none
)
endif()
pico_add_extra_outputs(blink)
rm -rf build
mkdir build
cd build
cmake ..
設定が成功した! 次に以下を実行
cmake --build . -j$(nproc)https://gist.github.com/stonehippo/03677c206bf68846328f151ee8322193 ::
wio terminal examples
https://www.denshi.club/parts/2021/03/circuitpython-10-step5-1-raspberry-pi-pico.html::
raspberry pi pico
package main
import (
"fmt"
"machine"
"strings"
"time"
)
const (
SSID = "Pikara2-91d8e4"
PASSWORD = ""
)
// ==================================================
// ATコマンドをESP-01へ送信して応答を表示
// ==================================================
func sendAT(uart *machine.UART, cmd string, wait time.Duration) string {
fmt.Println("=> Send:", cmd)
// ATコマンド送信
uart.Write([]byte(cmd + "\r\n"))
var buf [256]byte
var response strings.Builder
start := time.Now()
for time.Since(start) < wait { // wait時間内は応答をまつ
// TinyGoでは Read() は (int, error)
n, _ := uart.Read(buf[:])
if n > 0 {
s := string(buf[:n])
// 応答を保存
response.WriteString(s)
// 受信内容を表示
fmt.Print(s)
// OKなら終了
if strings.Contains(response.String(), "OK") {
break
}
// ERRORなら終了
if strings.Contains(response.String(), "ERROR") {
break
}
}
time.Sleep(10 * time.Millisecond)
}
return response.String()
}
// ==================================================
// ESP-01のAT+CIFSR応答からIPアドレスを抽出
//
// 例:
// +CIFSR:STAIP,"192.168.1.20"
// ==================================================
func extractIP(s string) string {
lines := strings.Split(s, "\n")
for _, line := range lines {
line = strings.TrimSpace(line)
if strings.Contains(line, "STAIP") {
// 最初の " を探す
start := strings.Index(line, `"`)
if start < 0 {
continue
}
// 2個目の " を探す
end := strings.Index(line[start+1:], `"`)
if end < 0 {
continue
}
return line[start+1 : start+1+end]
}
}
return ""
}
// ==================================================
// メイン
// ==================================================
func main() {
// ==================================================
// Raspberry Pi Pico
//
// GP0 = UART0 TX -> ESP-01 RX
// GP1 = UART0 RX <- ESP-01 TX
//
// GND ------------- GND
// ==================================================
uart := machine.UART0
uart.Configure(machine.UARTConfig{
BaudRate: 115200,
TX: machine.GP0,
RX: machine.GP1,
})
// ESP-01起動待ち
time.Sleep(3 * time.Second)
fmt.Println()
fmt.Println("================================")
fmt.Println(" Raspberry Pi Pico + ESP-01")
fmt.Println(" WiFi connection")
fmt.Println("================================")
fmt.Println()
// ==================================================
// UART受信バッファをクリア 空読みで
// ==================================================
var dummy [64]byte
for uart.Buffered() > 0 {
_, _ = uart.Read(dummy[:])
}
// ==================================================
// ESP-01動作確認
// ==================================================
response := sendAT(
uart,
"AT",
1*time.Second,
)
if strings.Contains(response, "ERROR") {
fmt.Println("ESP-01 did not respond.")
return
}
// ==================================================
// Wi-Fi Stationモード
// ==================================================
sendAT(
uart,
"AT+CWMODE=1",
1*time.Second,
)
// ==================================================
// Wi-Fiアクセスポイントへ接続
// ==================================================
cmd := `AT+CWJAP="` + SSID + `","` + PASSWORD + `"`
fmt.Println()
fmt.Println("Connecting to WiFi...")
fmt.Println("SSID:", SSID)
// 十分時間をとってアクセスする
response = sendAT(
uart,
cmd,
20*time.Second,
)
// Wi-Fi接続エラー
if strings.Contains(response, "ERROR") {
fmt.Println()
fmt.Println("WiFi connection failed.")
return
}
// ==================================================
// IPアドレス取得
// ==================================================
fmt.Println()
fmt.Println("Getting IP address...")
response = sendAT(
uart,
"AT+CIFSR",
3*time.Second,
)
// ==================================================
// IPアドレス抽出
// ==================================================
ip := extractIP(response)
fmt.Println()
if ip != "" {
fmt.Println("==============================")
fmt.Println(" WiFi connected!")
fmt.Println()
fmt.Println(" IP address:", ip)
fmt.Println("==============================")
} else {
fmt.Println("==============================")
fmt.Println(" IP address could not be obtained.")
fmt.Println("==============================")
}
// ==================================================
// ここで停止
// ==================================================
for {
time.Sleep(1 * time.Second)
}
}
wioterminal :: githubで得たgo codeの場合、go mod tidyで関連ファイルをゲットすればOK
ただし本書のgoのヴァージョンが古いので最新のtool chainがつかえないので注意
picowの場合は特定のディレクトリだけtool chainがつかえるgoとtinygoをインスト必要!
ーーーーーーーーーーーーーーーーーーーーーーーーーーー
https://qiita.com/t_aks/items/70e23807c1ffd747bf24 pyenv and venv
ーーーーーーーーーーーーーーーーーーーーーーーーーーーーーーーーーー
https://zenn.dev/mabo23/articles/108540be08aff4
以前の記事で、仮想環境についての基本的な知識と、使用する理由についてまとめました。
(参考: https://qiita.com/mabo23/items/c2cb995a98d7003d7bdd)
この記事では、実際にPython標準の仮想環境作成モジュール「venv」使って仮想環境を構築する手順について、実際の動作をイメージしやすいよう、仕組みについて言及しながら解説していきます。
※ なお、この記事は仮想環境の基本と使用理由について押さえている方が対象です。もし、まだ理解できていないという方は、上記の記事を参考にしていただけますと幸いです。
※ また、「シェルとプロセスの関係」について押さえておくことでより正しく処理の流れを理解することができます。シェルとプロセスの関係について、以下の記事にまとめていますので、よろしければ参考にしてみてください。
(参考: https://qiita.com/mabo23/items/45b4838050a95903d10e)
※ 本記事では、Mac や Linux など Unix 系システムでの動作を前提としています。
Windows ユーザの方は、PowerShell や .bat ファイルを使った activate 方法が異なるため、適宜読み替えてください。
venv を使った仮想環境の作成と有効化・無効化の手順PATH などの環境変数が果たす役割fork → exec によるプロセス実行の流れsource などのビルトインコマンドと外部コマンドの違い仮想環境とは、あるプロジェクト専用のPython実行環境を、自分のPCの中に一時的に用意する仕組みのことです。これを使うことで、複数のプロジェクトごとに異なるライブラリやバージョンのPythonを共存させることができます。
※https://www.tutorialspoint.com/python/python_virtual_environment.htm より画像引用
Pythonでは、外部ライブラリの多くを pip install によってインストールして使用します。
もし仮想環境を使わず、グローバル環境(OS全体で共通のPython)に直接インストールしてしまうと、他のプロジェクトとライブラリのバージョンが衝突してしまい、動かなくなってしまうことがあります。
例えば、あるプロジェクトでは Django 3.2 が必要で、別のプロジェクトでは Django 4.0 が必要だとしましょう。これを同時にグローバル環境に共存させることはできません。
しかし、仮想環境を使えば、各プロジェクトごとに別々のDjangoを自由にインストールでき、互いに干渉しないようにできます。
このように仮想環境は、プロジェクトごとの依存関係をきちんと分離するための土台となる非常に重要な仕組みです。
ディレクトリを作る
$ mkdir myapp
$ cd myapp
仮想環境を作る(最初の1回だけ)
$ python3 -m venv venv
仮想環境を有効化(毎回の作業時)
$ source venv/bin/activate
プログラムを書く・pip installする
必要に応じて作業が終わったら無効化
$ deactivate
まずは、ターミナルやコマンドプロンプトで、仮想環境を置きたいディレクトリに移動しましょう。
プロジェクト用のフォルダがまだない場合は、作成しておくとわかりやすいです。
$ mkdir project  # ディレクトリの作成
$ cd project     # 当該ディレクトリに移動
Python 3.3以降には、標準ライブラリとして venv モジュールが搭載されており、追加のツールを入れずに仮想環境を簡単に作成することができます。
python3 -m venv venv # 仮想環境 venv の作成
各コマンドの意味
python3: Pythonインタプリタを呼び出す
※「インストールされている Python 3.x の実行環境を起動する」という意味
-m: Python モジュールをスクリプトとして実行するためのオプション
例えば python3 -m venv は「venv というモジュールの中にある処理を実行せよ」という意味になります。
venv(1つ目): 使用するモジュール名
venv.py という Python ファイル(もしくはパッケージ)がモジュールです。
venv(2つ目): 作成するディレクトリ名
ここで指定された名前のディレクトリに、仮想環境の構成(Python実行ファイル・ライブラリのコピー・activateスクリプトなど)が生成されます。
ここでは任意のディレクトリ名をつけることができます。
このコマンドによって、venv という名前のフォルダが作られ、その中にPythonの実行ファイルやパッケージ管理に必要な仕組み一式が構成されます。macOSやLinuxでは bin/ ディレクトリが作られ、その中に python や pip などの実行ファイルが配置されます。
venv/ ディレクトリ構成(例)venv/
├── bin/ # 仮想環境を操作するための実行ファイルやスクリプトがを格納
│ ├── activate # 仮想環境を有効化するためのシェルスクリプト
│ ├── activate.csh
│ ├── activate.fish
│ ├── pip
│ ├── pip3 # 仮想環境専用のpipコマンド
│ ├── python
│ └── python3 # 仮想環境専用のPython実行ファイル
├── include/ # Python C拡張をビルドするときに使うCヘッダファイルのためのディレクトリ
├── lib/ # 仮想環境が使う Python標準ライブラリや追加ライブラリ(site-packages) を保存する場所
│ └── python3.X/
│ └── site-packages/ # pip install したライブラリの保存先
└── pyvenv.cfg # 仮想環境の設定ファイル
この仮想環境は、実際にはグローバルにインストールされているPythonの実行ファイルをコピーまたはリンクする形で作られますが、内部的に仮想環境用に分離されたライブラリの検索パス(site-packages)を使うようになっています。
仮想環境を作成しただけでは、まだその環境は有効になっていません。仮想環境を使って開発を始めるには、まずその環境を「有効化(activate)」する必要があります。
仮想環境を有効化するため、以下のコマンドをターミナルで実行します。
$ source venv/bin/activate
このコマンドを実行することにより、現在のシェルプロセスに仮想環境が反映されるようになります。
※ Bash などの一部のシェルでは、source は .(ドット)と同義です
したがって、以下のコマンドも有効です。
$ . venv/bin/activate
有効化に成功すると、プロンプトの先頭に (venv) のような表示が付きます。
これは、現在のシェルセッションが仮想環境に切り替わっていることを意味します。
この状態で python3 と入力すると、仮想環境内の Python 実行ファイルが使われます。同様に pip3 を使えば、インストールされるパッケージはすべてこの仮想環境専用の領域(venv/lib/.../site-packages)に保存されるようになります。
つまり、この状態ではグローバル環境を一切汚さずにライブラリを自由に追加・削除することが可能になるわけです。
# 一部省略

venv/
├── bin/                    # 仮想環境を操作するための実行ファイルやスクリプトがを格納
│   ├── activate            # 仮想環境を有効化するためのシェルスクリプト
│   ├── pip3                # 仮想環境専用のpipコマンド
│   └── python3             # 仮想環境専用のPython実行ファイル
├── lib/
│   └── python3.X/
│       └── site-packages/  # pip install したライブラリの保存先
さらに、この動作を理解するためには、
① そもそもsourceコマンドが何か
② なぜこのコマンドを実行することで仮想環境が有効になるのか
を知る必要があります。
source コマンドは、主にシェルスクリプトや設定ファイルを現在のシェル環境で読み込んで実行するためのコマンドです。
$ source ファイル名 or ファイルパス
通常、スクリプトを実行すると、新しいシェルプロセスが始まり、その中で処理がされます。
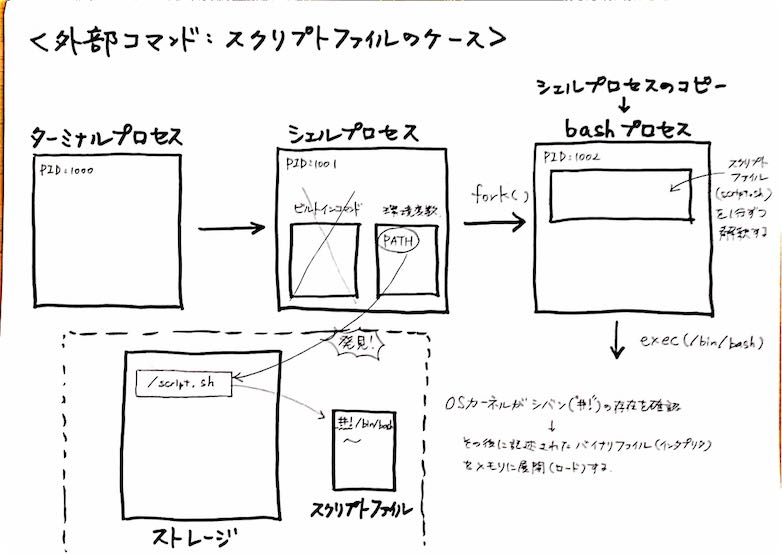 ※ 筆者の手書きメモ
sourceコマンドを使用することで「現在のシェル」内でファイルの読み込み・実行を行ないます。
※ sourceコマンドはビルトインコマンドで、新たなプロセスで実行されるわけではないので、注意しましょう
source)による実行 ※ 筆者の手書きメモ
なお、ビルトインコマンドと外部コマンド(バイナリファイル・スクリプトファイル)については、よろしければ以下の記事をご参照ください。
(参考: https://qiita.com/mabo23/items/8bf73985946c541572c4)
ここで、仮想環境を有効化するためのコマンドをもう一度見てみましょう。
$ source venv/bin/activate
これは、先ほど紹介した venv ディレクトリ構成例を元に一部抜粋すると、以下のようになります。
venv/
├── bin/                    # 仮想環境を操作するための実行ファイルやスクリプトがを格納
│   ├── activate            # 仮想環境を有効化するためのシェルスクリプト
.   .
.   .
.   .
つまり、venv フォルダの中にある activate ファイル(シェルスクリプト)を現在のシェルプロセスに読み込んでいます。
これによって、activate ファイルに記述されたシェルスクリプトが現在のプロセスに反映されます。
ちなみに、この activate ファイルは、venv モジュールを使って仮想環境を作成するときに自動的に作成されるシェルスクリプトファイルです。
そのため、$ source venv/bin/activateによってスクリプトファイルが実行されます。
activate は普通のシェルスクリプトファイルです。通常のシェルスクリプト同様、sourceコマンドを実行することで、スクリプトファイルの内容を現在のシェルプロセスに反映されます。
この activate というスクリプトファイルを実行することで、PATHという環境変数に変化があります。
PATHの先頭に venv/bin が置かれるということが環境変数内部で行われます。
具体的には以下のような処理が行われます。
PATH 環境変数の先頭に、仮想環境内の bin/ ディレクトリが追加されます。
これにより、同名のコマンド(例えば python3 や pip3のような bin/ ディレクトリは以下のディレクトリ)が仮想環境内のものを優先的に使うようになります。
_OLD_VIRTUAL_PATH="$PATH"
VIRTUAL_ENV="/home/user/project/venv"
PATH="$VIRTUAL_ENV/bin:$PATH"
export PATH
新たなPATH変数は以下の順番でディレクトリを探索することになります。
# PATH変更前
/usr/local/bin:/usr/bin:/bin:...

# PATH変更後
/home/user/project/venv/bin:/usr/local/bin:/usr/bin:/bin:...
これにより、以後の python3 や pip3 コマンドは、グローバル環境の /usr/bin/python3 ではなく、venv/bin/python3 を指すようになります。
VIRTUAL_ENV 環境変数の定義現在どの仮想環境が有効になっているかを示すため VIRTUAL_ENV という環境変数が設定されます。
この変数は deactivate するときにも使われます。
VIRTUAL_ENV="/home/user/project/venv"
export VIRTUAL_ENV
仮想環境が有効であることを視覚的にわかりやすくするため、プロンプト(PS1)に仮想環境の名前が追加されます。
PS1="(`basename \"$VIRTUAL_ENV\"`) $PS1"
仮想環境を終了させるための関数 deactivate がシェルに追加されます。
この関数が呼び出されると、PATH や PS1 の変更が元に戻り、仮想環境が無効になります。
deactivate () {
    # 元の PATH を復元
    PATH="$_OLD_VIRTUAL_PATH"
    export PATH
    # プロンプトを戻す(あれば)
    PS1="$_OLD_VIRTUAL_PS1"
    export PS1
    # その他のクリーンアップ
    unset VIRTUAL_ENV
    unset deactivate
}
これらの一連の処理によって、activate ファイルが読み込まれ、仮想環境が有効化します。
仮想環境を有効化し、python3 スクリプトファイル を実行すると、PATH の設定により仮想環境内の python3 実行ファイル(Pythonインタプリタ)が使用され、それが新たなプロセスとしてメモリにロードされ、スクリプトを実行していきます。
 ※ 筆者の手書きメモ
仮想環境を有効化すると、PATH の先頭に仮想環境の bin/ ディレクトリが追加されるため、
python3 コマンドを打ったときに 仮想環境内の python3 実行ファイル(実体はシンボリックリンクや実行ファイル)を使うようになります。
そして、python3 スクリプトファイル.py を実行すると、
python3 実行ファイル がプロセスとして起動され、venv/
├── bin/
│ ├── activate
│ ├── pip3
│ └── python3 # 仮想環境専用のPython実行ファイル(Pythonインタプリタ)
├── lib/
│ └── python3.X/
│ └── site-packages/
└── pyvenv.cfg
このときにロードされる Python 実行ファイルは、システム全体ではなく仮想環境用にインストールされたものです。
また、仮想環境を有効化している間に外部かインストールしたパッケージ(ファイル)は lib/ 配下の site-packages/ に保存されます。
deactivate は仮想環境を使わない状態に戻すための処理です。
現在使用している仮想環境を修了するために以下のコマンドを実行します。
$ deactivate
これにより、仮想環境は消えないが使わない状態にすることができます。
# deactivate 前
/home/user/project/venv/bin:/usr/local/bin:/usr/bin:/bin:...

# deactivate 後
/usr/local/bin:/usr/bin:/bin:...
仮想環境そのものはディレクトリとして残っているため、次回以降も同じように
$ source venv/bin/activate を実行することで再び利用できます。
venv/ フォルダ群として存在するこの仕組みを理解すると、仮想環境はプロセスの中に埋め込まれているものではなく、ストレージ上の構成とシェル環境変数の操作で成り立っていることがわかります。
また、仮想環境を有効にしている間も、プロセスの実行そのものは常に「fork→exec」の原則に従って行われていることがわかります。
Python仮想環境の操作は、一見単純に見えますが、実際にはOSとシェル、ファイルシステム、プロセス、環境変数といった複数の概念が密接に連動しています。
仮想環境を深く理解するには、単に venv フォルダがあるだけでなく、「どうやってその実行環境がメモリ上に展開されるのか」という視点を持つことが大切です。
本記事で紹介した「venv」を使った仮想環境の作成と運用の流れを、自分の手元のプロジェクトでぜひ実践してみてください。
最後までお読みいただき、ありがとうございました。
mutex.inoではtask1が優先的に実行されるが間違いではないとのこと
nomutex.inoではtask1とtask2が交互実行されたがMutexがきかんのがわかった
-----------------eventgroup.ino OK on raspico -----------------------
// 以下で使っている バッククォート ` は、Goでは「raw string literal(生文字列)」を表す!
package main
import (
"fmt"
"machine"
"time"
)
const (
SSID = "Pikara2-91d8e4"
PASSWORD = "090e219cbdbf5"
)
func main() {
// ==========================================
// Raspberry Pi Pico
//
// GP0 = UART0 TX -> ESP-01 RX
// GP1 = UART0 RX <- ESP-01 TX
// ==========================================
uart := machine.UART0
uart.Configure(machine.UARTConfig{
BaudRate: 115200,
TX: machine.GP0,
RX: machine.GP1,
})
fmt.Println("================================")
fmt.Println("Pico + ESP-01 WiFi test")
fmt.Println("================================")
// ESP-01起動待ち
fmt.Println()
fmt.Println("ESP-01 startup wait...")
time.Sleep(3 * time.Second)
// 受信バッファをクリア
clearUART(uart)
// ==========================================
// AT
// ==========================================
fmt.Println()
fmt.Println("================================")
fmt.Println(">> AT")
fmt.Println("================================")
if !sendAT(uart, "AT", 3*time.Second) {
fmt.Println("AT command failed")
return
}
// ==========================================
// WiFi Stationモード
// ==========================================
fmt.Println()
fmt.Println("================================")
fmt.Println(">> AT+CWMODE=1")
fmt.Println("================================")
if !sendAT(uart, "AT+CWMODE=1", 3*time.Second) {
fmt.Println("CWMODE command failed")
return
}
// ==========================================
// WiFiアクセスポイントへ接続
// ==========================================
fmt.Println()
fmt.Println("================================")
fmt.Println(">> AT+CWJAP")
fmt.Println("================================")
cmd := `AT+CWJAP="` + SSID + `","` + PASSWORD + `"`
if !sendAT(uart, cmd, 20*time.Second) {
fmt.Println("WiFi connection failed")
return
}
// ==========================================
// IPアドレス確認
// ==========================================
fmt.Println()
fmt.Println("================================")
fmt.Println(">> AT+CIFSR")
fmt.Println("================================")
sendAT(uart, "AT+CIFSR", 5*time.Second)
// ==========================================
// 完了
// ==========================================
fmt.Println()
fmt.Println("================================")
fmt.Println("WiFi connection test finished")
fmt.Println("================================")
// ==========================================
// 以後ESP-01からの受信を表示
// ==========================================
fmt.Println()
fmt.Println("Waiting for ESP-01 data...")
for {
readUART(uart)
time.Sleep(100 * time.Millisecond)
}
}
// ==================================================
// ATコマンド送信
//
// ESP-01の回答を表示しながら待つ
//
// OK
// ERROR
// WIFI CONNECTED
// WIFI GOT IP
// などをそのまま表示する
// ==================================================
func sendAT(uart *machine.UART, command string, wait time.Duration) bool {
// 受信バッファをクリア
clearUART(uart)
fmt.Println("SEND:")
fmt.Println(command)
// ATコマンド送信
_, err := uart.Write([]byte(command + "\r\n"))
if err != nil {
fmt.Println("UART write error")
return false
}
fmt.Println("RESPONSE:")
start := time.Now()
for time.Since(start) < wait {
// ESP-01からの回答を読む
response := readUART(uart)
if response != "" {
// ------------------------------------------
// エラー
// ------------------------------------------
if contains(response, "ERROR") {
fmt.Println()
fmt.Println("ESP-01 returned ERROR")
return false
}
// ------------------------------------------
// WiFi接続成功
// ------------------------------------------
if contains(response, "WIFI GOT IP") {
fmt.Println()
fmt.Println("WiFi connected!")
return true
}
// ------------------------------------------
// 通常のATコマンド成功
// ------------------------------------------
if contains(response, "\r\nOK\r\n") ||
contains(response, "\nOK\r\n") ||
contains(response, "\nOK") {
fmt.Println()
fmt.Println("Command OK")
return true
}
}
time.Sleep(10 * time.Millisecond)
}
fmt.Println()
fmt.Println("Timeout")
return false
}
// ==================================================
// ESP-01からデータを読む
//
// 戻り値:
// 受信した文字列
// ==================================================
func readUART(uart *machine.UART) string {
buf := make([]byte, 64)
result := ""
for uart.Buffered() > 0 {
n, err := uart.Read(buf)
if err != nil {
return result
}
if n > 0 {
data := string(buf[:n])
// ESP-01の回答を即時表示
fmt.Print(data)
result += data
}
}
return result
}
// ==================================================
// UART受信バッファをクリア
// ==================================================
func clearUART(uart *machine.UART) {
buf := make([]byte, 64)
for uart.Buffered() > 0 {
_, _ = uart.Read(buf)
}
// 少し待って追加データが来ないことを確認
time.Sleep(20 * time.Millisecond)
for uart.Buffered() > 0 {
_, _ = uart.Read(buf)
}
}
// ==================================================
// 文字列検索
//
// stringsパッケージを使わず簡単に検索
// ==================================================
func contains(s string, sub string) bool {
if sub == "" {
return true
}
if len(sub) > len(s) {
return false
}
for i := 0; i <= len(s)-len(sub); i++ {
if s[i:i+len(sub)] == sub {
return true
}
}
return false
}
古いtinygoだと文句いわれながらチャットくんにつくてもらった 3.3v駆動のws2812
package main
import (
"image/color"
"machine"
"time"
"tinygo.org/x/drivers/ws2812"
)
const numLEDs = 5
const ledPin = machine.GP15
func main() {
ledPin.Configure(machine.PinConfig{Mode: machine.PinOutput})
// ビットバン駆動の初期化
ws := ws2812.New(ledPin)
leds := make([]color.RGBA, numLEDs)
for {
// 1. 赤色に点灯
fill(leds, color.RGBA{R: 0xFF, G: 0x00, B: 0x00})
// colorsToBytesで変換した []byte を Write に渡す
ws.Write(colorsToBytes(leds))
time.Sleep(time.Second)
// 2. 緑色に点灯
fill(leds, color.RGBA{R: 0x00, G: 0xFF, B: 0x00})
ws.Write(colorsToBytes(leds))
time.Sleep(time.Second)
}
}
func fill(leds []color.RGBA, c color.RGBA) {
for i := range leds {
leds[i] = c
}
}
毎回以下は一緒
kaluma bundle ./index.js 依存ライブラリがあろうとなかろうと
kaluma flash ./index.js --bundle こう書かんといかんようになっている
kalumas shell で .hi がでたらコードが自動開始される 実行は.loadでおこなう
ーーーーーーーーーーーーーーーーーーーーーーーーーーーーーーーーー
コードと回路が以下にある
avascript.plainenglish.io/physical-computing-with-javascript-3-8-reading-state-of-switch-106137a2f9d6 :: reading state of button
const LED = 15;
const BTN = 14;
pinMode(LED,OUTPUT);
pinMode(BTN,INPUT_PULLUP);
setWatch(() => {
digitalToggle(LED);
},BTN,FALLING,10);
-------------------------------------------------------------------------
https://javascript.plainenglish.io/physical-computing-with-javascript-4-8-led-dimming-403696103d2f :: led dimming
const LED = 15;
const POT = 26;
setInterval(() => {
let v = analogRead(POT);
analogWrite(LED,v);
},100);
------------------以下はraspicoにした、raspicowはうまくいかん、リベンジ--------
https://github.com/niklauslee/dht で成功
const pin = 15;
const {DHT} = require('dht');
const dht = new DHT(pin, DHT.DHT11);
let result = dht.read();
if (result) {
console.log(result);
console.log("Humidity: " + dht.humidity + " %");
console.log("Temperature: " + dht.temperature + " C");
} else {
console.log('Failed to read');
}
kaluma shellで.loadするとOKだった
-----------------------------------------------------------
https://github.com/pankleks/picomqtt をインストしてnode_modules/picomqttにもぐる そこでkaluma bundle ./index.js --bundleしてブートモードにせずにkaluma shell & .load
const WiFi = require("wifi").WiFi,
{ PicoMQTT } = require("./picomqtt.min");
const wifi = new WiFi();
wifi.connect({ ssid: "your-ssid", password: "your-password" }, (ex) => {
if (ex)
console.error(ex);
else {
console.log("wifi connected");
const mqtt = new PicoMQTT("broker.hivemq.com", { clientId: board.uid });
mqtt.on("connected", () => {
console.log("mqtt connected");
mqtt.subscribe("test/topic");
mqtt.publish("test/topic", "you should get this");
mqtt.publish("test/topic", "you should also get this");
mqtt.unsubscribe("test/topic");
mqtt.publish("test/topic", "you should not get this");
});
mqtt.on("message", (msg) => {
console.log(`mqtt message -> ${msg.topic}: ${msg.message}`);
});
mqtt.on("error", (ex) => {
console.log(`mqtt error -> ${ex.message || ex}`);
});
mqtt.on("disconnected", (reconnect) => {
console.log(`mqtt disconnected, reconnect = ${reconnect}`);
// if reconnect is true, mqtt will try to reconnect
});
mqtt.connect();
setTimeout(() => {
mqtt.disconnect(); // stop mqtt
}, 1000 * 120);
}
});
wifi connected
mqtt connected
mqtt message -> test/topic: you should get this
mqtt message -> test/topic: you should also get this
mqtt disconnected, reconnect = false
